
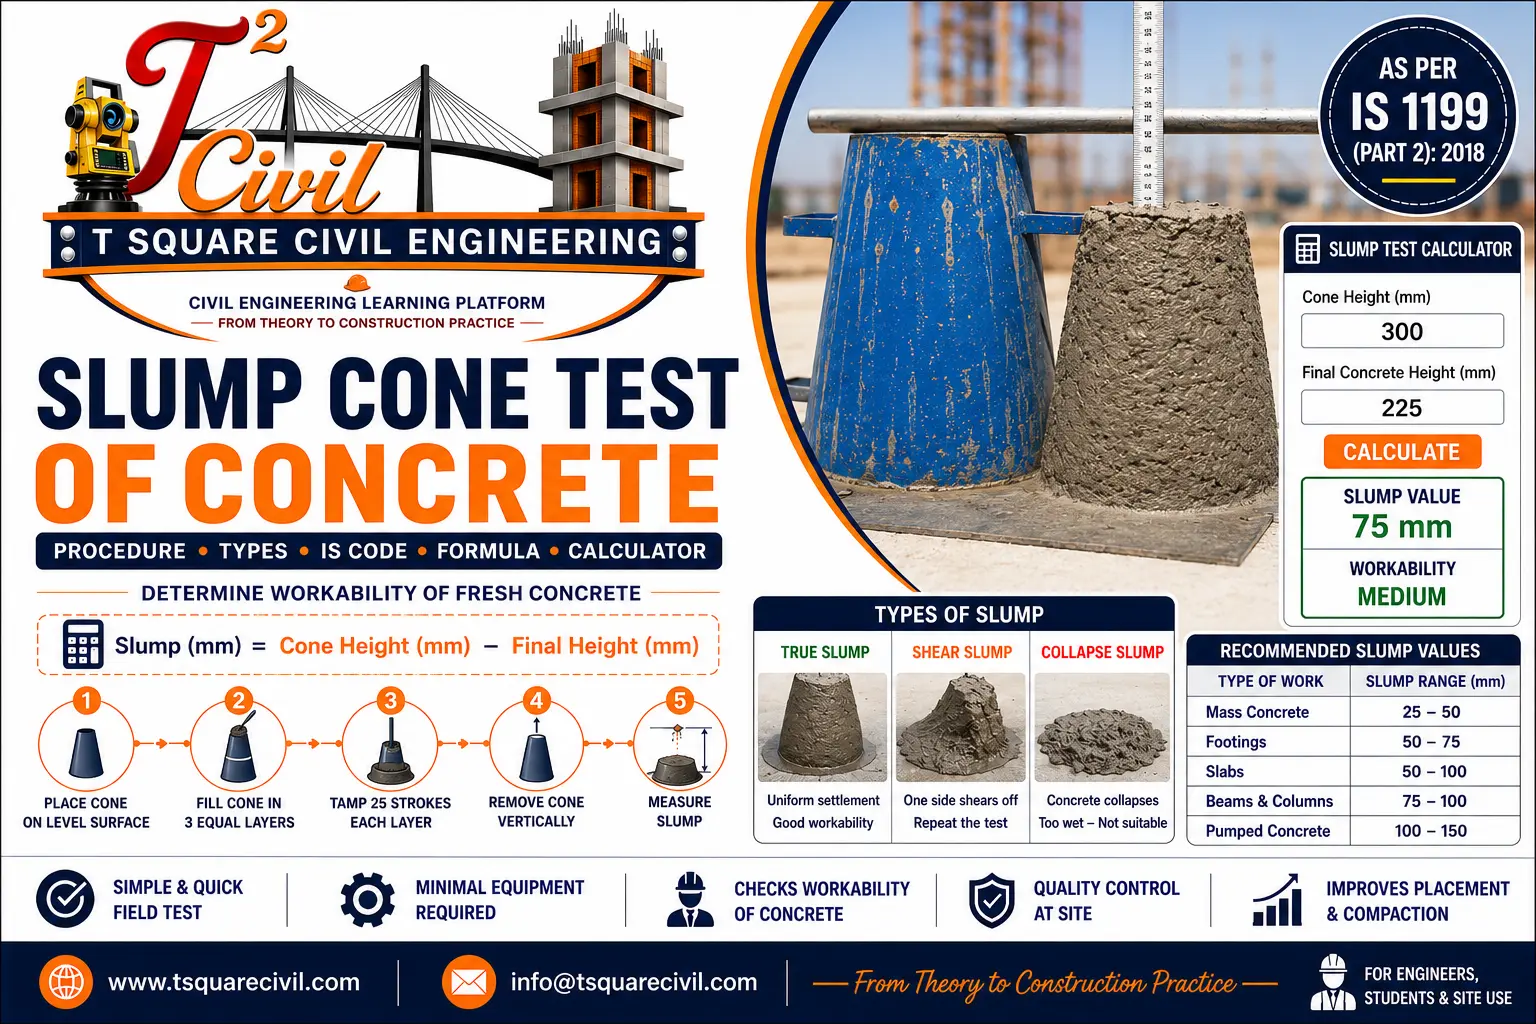
 by
by Page Contents
Last Updated: 14 Aug 2026 | Reviewed as per IS 1199 (Part 2): 2018, Reading Time: 15–18 minutes
Introduction to the Slump Cone Test of Concrete
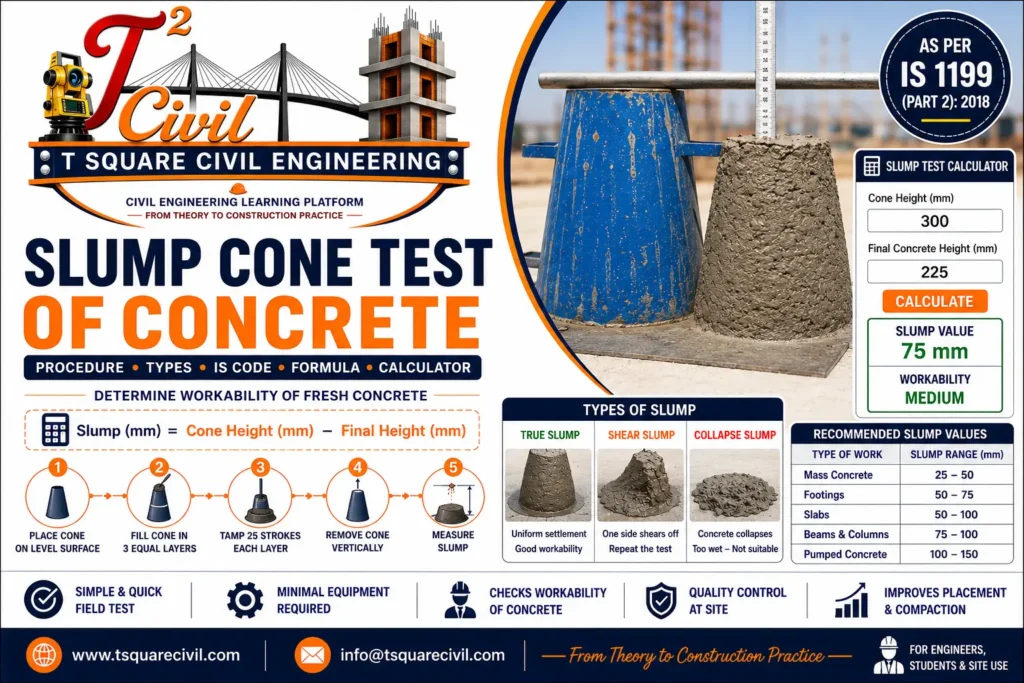
The Slump Cone Test of Concrete is a field and laboratory test used to determine the consistency of fresh concrete and to provide a practical indication of its workability.
As per IS 1199 (Part 2):2018, fresh concrete is placed in a standard slump cone in three approximately equal compacted layers. Each layer is tamped 25 times using the standard tamping rod. The mould is then lifted vertically and the vertical subsidence of the concrete is measured as the slump value in millimetres.
The standard slump cone has nominal dimensions of approximately:
Height: 300 mm
Bottom diameter: 200 mm
Top diameter: 100 mm
The dimensional tolerances specified for the mould are 300 ± 2 mm height, 200 ± 2 mm base diameter and 100 ± 2 mm top diameter.
The tamping rod is 16 ± 1 mm in diameter and 600 ± 5 mm long, with rounded ends.
The slump test is useful for monitoring consistency between concrete batches and checking whether the delivered concrete has the workability required by the approved mix design and project specification.
Important: The slump test does not directly determine concrete compressive strength or the actual water–cement ratio. A change in slump can result from water content, aggregate properties, admixture dosage, temperature, elapsed time and other mix variables.
What Is the Slump Cone Test?
The Slump Cone Test is a field and laboratory test for measuring the consistency of fresh concrete.
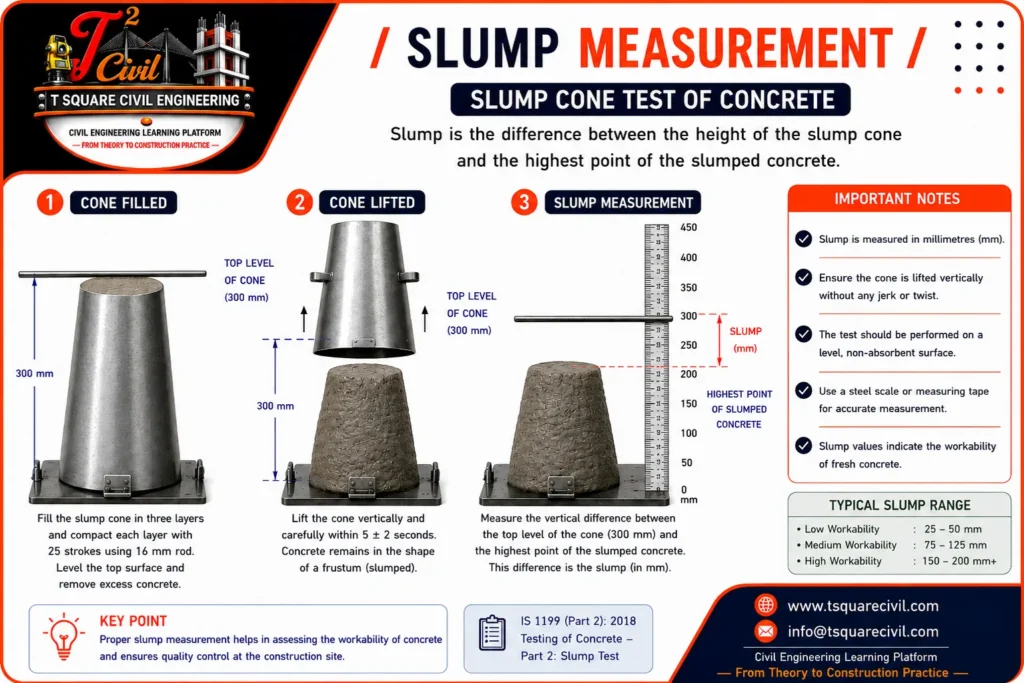
Fresh concrete is compacted inside a standard cone-shaped mould. After the mould is lifted vertically, the concrete subsides under its own weight. The difference between the original mould height and the highest point of the slumped concrete is measured as the slump value in millimetres.
Slump Value (mm) = Height of Slump Cone − Height of Slumped Concrete
For the standard IS procedure:
- the mould is filled in 3 layers;
- each layer receives 25 tamping strokes;
- the mould height is 300 mm;
- the mould is lifted vertically in 5 ± 2 seconds; and
- a true slump is reported to the nearest 5 mm.
The slump value should always be interpreted against the approved mix design and project specification rather than treated as a universal acceptance value.
Quick Information
| Parameter | Details |
|---|---|
| Test Name | Slump Cone Test of Concrete |
| Purpose | Determination of consistency of fresh concrete and practical assessment of workability |
| Test Standard | IS 1199 (Part 2):2018 |
| Cone Height | 300 ± 2 mm |
| Bottom Diameter | 200 ± 2 mm |
| Top Diameter | 100 ± 2 mm |
| Tamping Rod | 16 ± 1 mm diameter × 600 ± 5 mm long, rounded ends |
| Number of Layers | 3 approximately equal compacted layers |
| Tamping Strokes | 25 strokes per layer |
| Cone Lifting Time | 5 ± 2 seconds |
| Maximum Time from Start of Filling to Mould Removal | 180 seconds |
| Measurement | Difference between mould height and highest point of the slumped concrete |
| Reporting | Record true slump to the nearest 5 mm |
| Applicable Slump Range of the Test Method | Approximately 10–210 mm |
| Valid Slump for Numerical Reporting | True slump |
| If Shear or Collapse Occurs | Take another sample and repeat the complete test |
| Result Unit | mm |
Important: The 10–210 mm range describes the applicability of the slump test method under IS 1199 (Part 2). It is not a universal concrete acceptance range. Project acceptance should be based on the approved mix design, specifications and applicable quality-control requirements.
Key Takeaways
✔ The Slump Cone Test is the most commonly used field test for determining the workability of fresh concrete.
✔ It is performed according to IS 1199 (Part 2) before placing concrete at the construction site.
✔ The test measures the vertical settlement (slump) of fresh concrete after the slump cone is lifted vertically.
✔ Slump value helps engineers assess whether the concrete can be transported, placed, compacted, and finished without segregation or excessive bleeding.
✔ The three types of slump are True Slump, Shear Slump, and Collapse Slump, each indicating different characteristics of the concrete mix.
✔ The Slump Test is a rapid quality-control test but does not determine the compressive strength of concrete.
✔ The measured slump should always be compared with the approved concrete mix design and project specifications before concrete placement.
Why Read This Guide?
This guide explains the Slump Cone Test in a practical, step-by-step manner suitable for engineering students, site engineers, quality control engineers, diploma students, GATE aspirants and construction professionals. In addition to the standard procedure as per IS 1199 (Part 2): 2018, it covers field applications, common mistakes, troubleshooting, recommended slump values, interview questions, FAQs, and practical engineering tips. Whether you are preparing for examinations or performing quality control on site, this guide provides all the essential information in one place.
What Is Slump in Concrete?
In concrete technology, slump is the vertical settlement (drop in height) of freshly mixed concrete when a standard slump cone mould is filled, compacted and then lifted vertically.
Once the cone is removed, the concrete subsides. The amount of subsidence is the slump value, and it indicates the workability of the mix:
• Higher slump: Indicates more flowable and workable concrete within the context of the designed mix.
• Lower slump: Indicates a comparatively stiffer concrete mix with lower workability.
• Unexpectedly high slump: May indicate additional water, batching variation, aggregate-moisture variation, admixture dosage variation or another change in the concrete. Risk of segregation, bleeding and loss of strength
Important: A high slump does not automatically mean low-strength concrete. A properly designed concrete containing suitable water-reducing or superplasticizing admixtures can achieve high workability without increasing the specified water–cement ratio. The slump test does not measure compressive strength. It only indicates workability and consistency.
Objectives of the Slump Cone Test of Concrete
The Slump Cone Test of Concrete is conducted to determine the workability and consistency of fresh concrete before it is placed in the formwork. The test provides a quick, reliable method for assessing whether the concrete mix has adequate workability for transportation, placement, compaction, and finishing without causing segregation or excessive bleeding.
The Slump Cone Test of Concrete is carried out to evaluate the consistency and practical workability of fresh concrete before placement.
The main objectives are:
- to determine the consistency and workability of fresh concrete;
- to check uniformity between different concrete batches;
- to detect significant variations in fresh-concrete consistency;
- to identify possible changes in batching, aggregate moisture, water content or admixture dosage;
- to support site quality control before concrete placement; and
- to confirm that the measured slump is compatible with the approved mix design and placement requirements.
Site Engineer’s Note: The slump test is a quality-control test and Slump-test frequency should follow the approved Quality Assurance Plan, project specification and contractual requirements.. Slump can also be affected by aggregate grading, moisture condition, admixtures, temperature and elapsed time after mixing. The measured slump should always be compared with the specified slump range mentioned in the approved concrete mix design.
Principle of the Slump Cone Test
The Slump Cone Test is based on the principle that fresh concrete behaves as a plastic material under its own weight. When the standard slump cone mould is filled with freshly mixed, properly compacted concrete and then lifted vertically, the concrete subsides due to gravity.
The Slump Cone Test is based on the vertical subsidence of freshly compacted concrete under its own weight after removal of a standard conical mould.
Fresh concrete is compacted in a mould having a height of 300 mm. When the mould is lifted vertically, the concrete loses the lateral support provided by the mould and subsides.
The slump is measured as:
Slump (mm) = 300 mm − Height of Slumped Concrete
A larger slump generally indicates a more flowable mix, while a smaller slump indicates a comparatively stiffer mix.
However, slump should not be interpreted independently as a measure of concrete strength. Instead, it serves as a rapid field test for evaluating the ease with which fresh concrete can be transported, placed, compacted, and finished. A high slump may be intentionally achieved using suitable water-reducing or superplasticizing admixtures without increasing the specified water–cement ratio.
Relevant IS Codes for Slump and Concrete Workability
The principal Indian Standard for the slump cone test is:
IS 1199 (Part 2):2018 – Fresh Concrete: Methods of Sampling, Testing and Analysis – Determination of Consistency of Fresh Concrete.
This standard covers the slump test procedure, mould dimensions, tamping requirements, measurement and reporting of the result.
Other commonly referenced standards include:
| IS Code | Relevance |
|---|---|
| IS 1199 (Part 2):2018 | Detailed slump and fresh-concrete consistency test methods |
| IS 456:2000 | Plain and reinforced concrete – general concrete requirements |
| IS 10262:2019 | Concrete mix proportioning guidelines |
| IS 4926 | Ready-mixed concrete requirements |
| IS 516 series | Tests relating to hardened concrete properties |
Direct Answer: The detailed Indian Standard for the Slump Cone Test is IS 1199 (Part 2):2018. IS 456 may be referred to for broader concrete requirements, but the slump-test procedure itself is covered by IS 1199 (Part 2).
Practical Tip: Always verify that your project specifications refer to the latest revisions of the relevant IS Codes before carrying out testing on site.
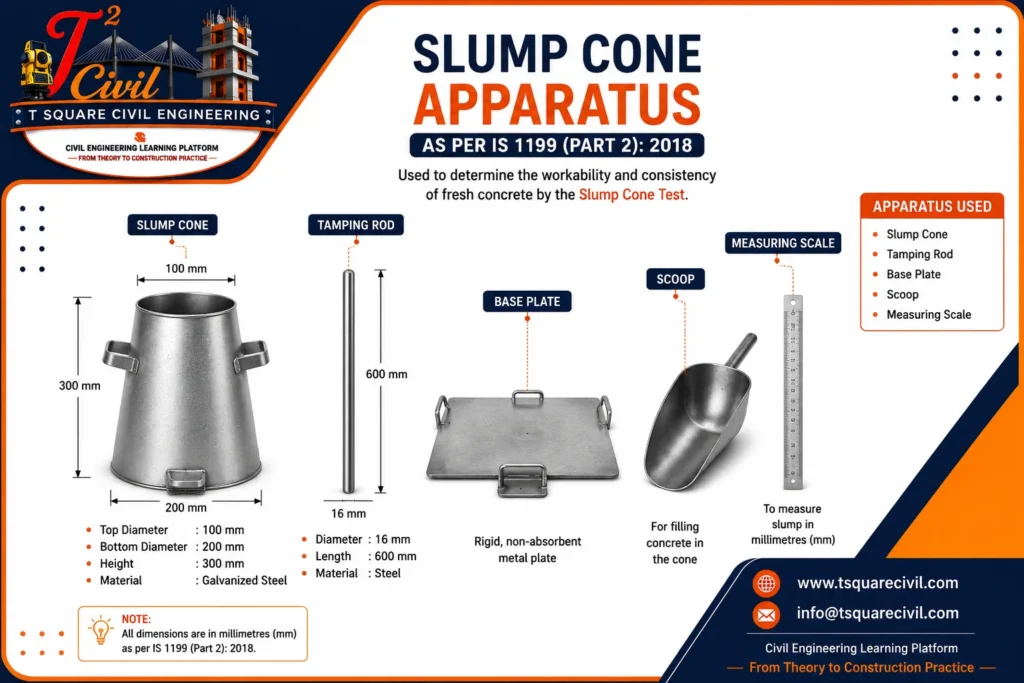
Slump Cone Test Apparatus
The slump test requires simple standardized equipment so that results obtained at different sites and laboratories can be compared reliably.
The main apparatus consists of:
Slump Cone / Mould
- Shape: hollow frustum of a cone
- Height: 300 ± 2 mm
- Bottom diameter: 200 ± 2 mm
- Top diameter: 100 ± 2 mm
- Interior: smooth and free from hardened concrete or dents
Tamping Rod
- Diameter: 16 ± 1 mm
- Length: 600 ± 5 mm
- Ends: rounded
Other Equipment
- rigid, level and non-absorbent base plate;
- measuring rule graduated suitably for slump measurement;
- scoop;
- remixing tray;
- shovel; and
- timer.
The dimensions and condition of the mould and tamping rod are important because deviations can affect the measured slump.
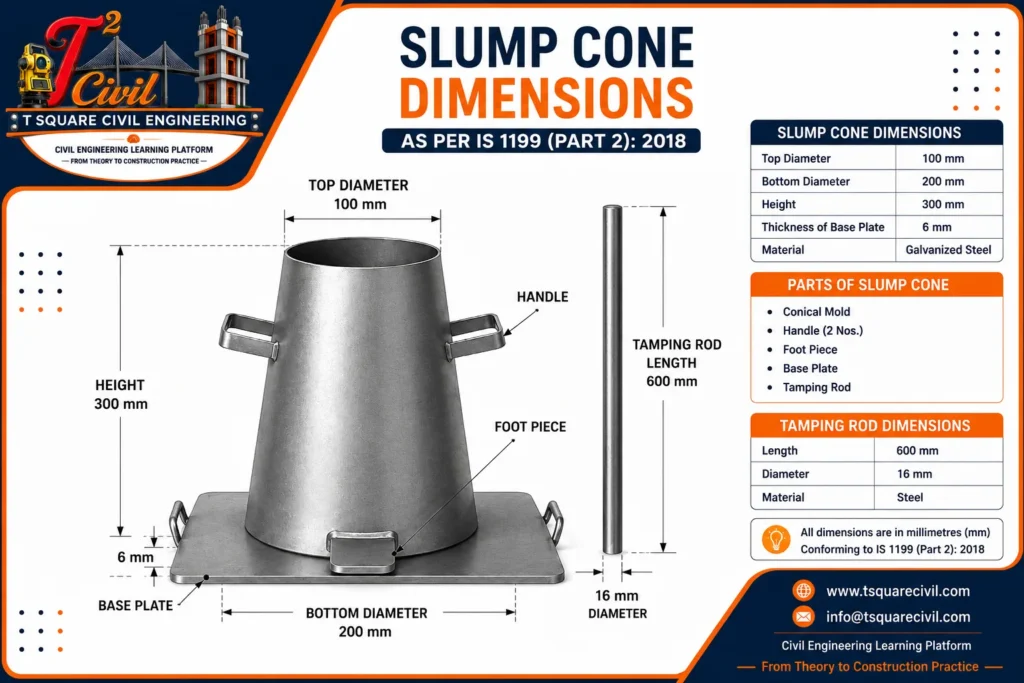
Standard Slump Cone Dimensions
The standard slump cone dimensions used for the test are:
| Component | Standard Dimension |
|---|---|
| Cone Height | 300 ± 2 mm |
| Bottom Diameter | 200 ± 2 mm |
| Top Diameter | 100 ± 2 mm |
| Tamping Rod Diameter | 16 ± 1 mm |
| Tamping Rod Length | 600 ± 5 mm |
| Number of Layers | 3 Layers |
| Tamping Strokes per Layer | 25 per layer |
The nominal cone dimensions are commonly remembered as:
300 mm height × 200 mm bottom diameter × 100 mm top diameter.
Engineering Note: Use the specified apparatus dimensions and test procedure for formal laboratory or site testing. Even relatively small variations in the mould or compaction procedure can affect the measured slump.
Sample Collection
Proper sampling of fresh concrete is essential to obtain reliable slump test results. A non-representative sample may produce misleading values and result in incorrect decisions regarding the acceptance or rejection of concrete.
Guidelines for Sample Collection
- Collect the sample immediately after concrete is discharged from the transit mixer or batching plant.
- Mix the sample thoroughly before testing.
- Protect the concrete from direct sunlight and strong winds.
- Perform the slump test without unnecessary delay.
- Avoid adding water to improve workability after sampling.
- Ensure the sample represents the entire batch of concrete.
Quality Control Tip: On construction sites, the slump test should ideally be completed within a few minutes of sampling to minimise the effects of hydration and moisture loss.
Slump Cone Test Procedure (Step‑by‑Step)
The following procedure summarizes the slump cone test as per IS 1199 (Part 2):2018.
Step 1 – Prepare the Equipment
Dampen the slump cone and base plate and remove excess water. Place the mould on a rigid, level, smooth and non-absorbent surface.
Step 2 – Fill the Cone in Three Layers
Immediately after preparing the representative fresh-concrete sample, fill the mould in three approximately equal compacted layers.
Step 3 – Tamp Each Layer
Compact each layer with 25 strokes of the standard tamping rod, distributing the strokes uniformly over the cross-section.
For the second and third layers, allow the rod to penetrate slightly into the underlying layer.
Step 4 – Strike Off the Surface
After compacting the top layer, strike off the concrete level with the top of the mould and remove spilled concrete from the base plate.
Step 5 – Lift the Mould
Lift the slump cone vertically in 5 ± 2 seconds using a steady upward movement without lateral or twisting motion.
Step 6 – Measure the Slump
Immediately measure the vertical difference between the height of the mould and the highest point of the slumped concrete.
Report a true slump to the nearest 5 mm.
The entire operation from the start of filling the mould to removal of the mould should be completed without interruption within 180 seconds.
Testing Frequency: The frequency of slump testing should follow the approved Quality Assurance Plan, project specification and contractual requirements. Testing every transit mixer may be required on some projects, but it is not a universal rule for every project. The measured slump should always be compared with the approved mix design and project specifications. Concrete should not be accepted or rejected solely based on the slump value without considering the specified allowable tolerance.
Flowchart of the Slump Cone Test
Collect Representative Fresh Concrete Sample
↓
Dampen the Slump Cone and Base Plate and Remove Excess Water
↓
Place the Cone on a Rigid, Level and Non-Absorbent Surface
↓
Fill the Cone in Three Approximately Equal Compacted Layers
↓
Tamp Each Layer with 25 Uniform Strokes
↓
Strike Off the Top Surface Level with the Mould
↓
Lift the Cone Vertically in 5 ± 2 Seconds Without Twisting
↓
Measure the Slump Immediately (mm)
↓
Record a True Slump to the Nearest 5 mm
↓
Compare the Result with the Approved Mix Design and Project Specification
↓
Record the Result and Take the Required Quality-Control Action
Test Timing: The operation from the start of filling the mould to removal of the mould should be completed without interruption within 180 seconds.
Slump Cone Test Range and Limit as per IS 1199 Part 2
The slump test method under IS 1199 (Part 2):2018 is applicable to fresh concrete having a slump approximately between 10 mm and 210 mm.
If the measured consistency falls outside this range, another suitable method of determining fresh-concrete consistency should be considered.
Important: The 10–210 mm range is the applicability range of the slump test method. It is not a universal acceptable slump range for every concrete mix.
Therefore:
Specified Project Slump ≠ Universal Slump-Test Limit
Always compare the measured value with the approved concrete mix requirement.
The required project slump depends on factors such as:
- approved concrete mix design;
- method of placement;
- pumping requirements;
- reinforcement congestion;
- concrete grade and application;
- admixture system; and
- project specifications.
Therefore, the measured slump should always be compared with the specified project slump or approved mix-design requirement.
Which IS Code Is Used for the Slump Cone Test?
The test method for determining slump of fresh concrete is covered by:
IS 1199 (Part 2):2018 – Fresh Concrete: Methods of Sampling, Testing and Analysis – Determination of Consistency of Fresh Concrete.
IS 456:2000 is an important concrete code of practice and contains requirements relating to concrete quality and workability, but the detailed slump cone test procedure is given in IS 1199 (Part 2).
Therefore, when someone asks “What is the IS Code for the Slump Cone Test?”, the direct answer is:
IS 1199 (Part 2):2018.
Slump Test Formula
The basic slump test formula is:
Slump Value (mm) = Height of Cone − Height of Slumped Concrete
Example Calculation
Example 1
Given:
Height of Slump Cone = 300 mm
Measured Height after Slump = 225 mm
Calculation:
Slump = 300 − 225
Slump = 75 mm
Result:
The concrete exhibits medium workability, making it suitable for many reinforced concrete applications such as beams, slabs, and columns, depending on project specifications.
Example 2
Given:
Height of Cone = 300 mm
Height after Slump = 170 mm
Calculation:
Slump = 300 − 170
Slump = 130 mm
Result:
The concrete has high workability. Such a slump may be appropriate for pumped concrete or heavily reinforced sections, provided it complies with the approved mix design.
Calculation for Slump Value
Inputs
• Cone height (mm)
• Height of concrete after removing the mould (mm)
Formula
Slump (mm) = Cone height − Final concrete height
Based on the computed slump value, workability can be classified approximately as:
• 0–25 mm → Very low workability
• 26–50 mm → Low workability
• 51–100 mm → Medium workability
• 101–150 mm → High workability
• 150 mm → Very high workability
Types of Slump in Concrete
When the cone is removed, the shape of the concrete indicates not only the workability but also the cohesion and stability of the mix. The three commonly observed types of slump are:
1. True Slump
In a true slump, the concrete settles uniformly and retains a more or less conical shape, only slightly reduced in height.
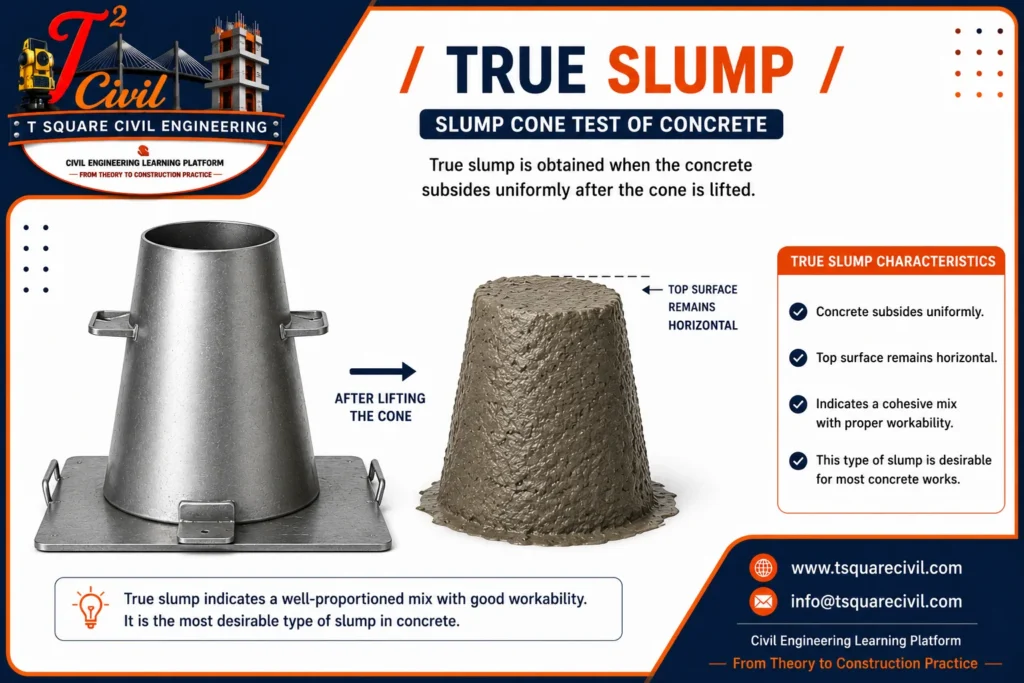
Characteristics:
• Indicates good cohesion and stability
• Typically represents a well‑proportioned mix
• Generally considered a desired slump pattern for normal workable concrete
2. Shear Slump
In a shear slump, part of the concrete mass shears off and slips sideways, giving an uneven profile.
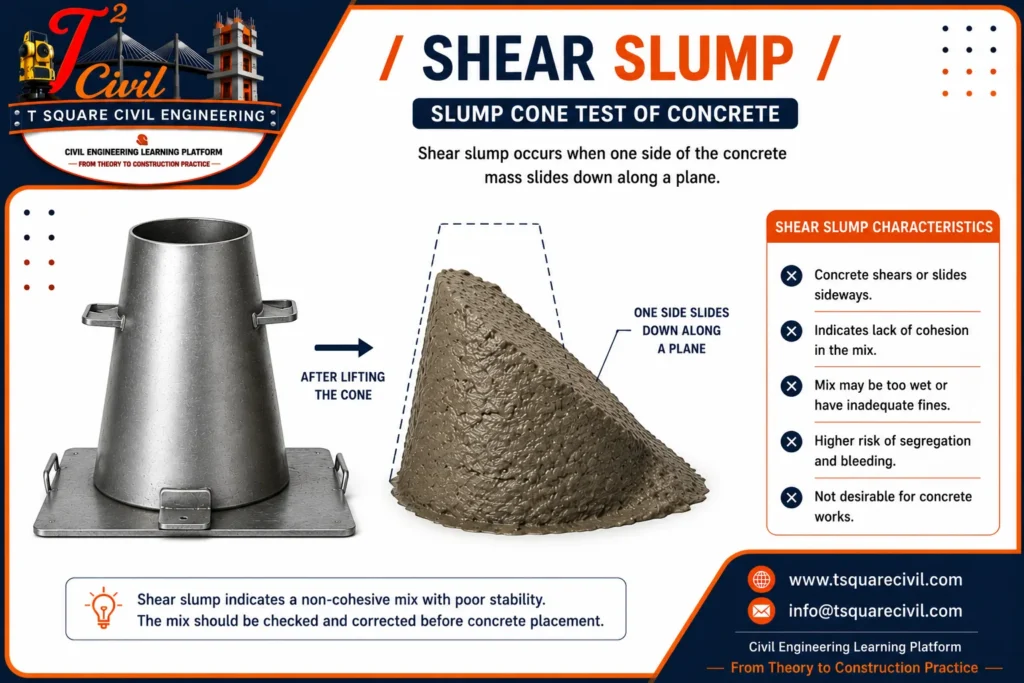
Characteristics:
• Suggests poor cohesion or possible lack of stability
• Indicates that the concrete mix may be harsh or unworkable
• The test is usually repeated, and the mix should be reviewed
3. Collapse Slump
A collapse slump occurs when the concrete totally collapses or flattens upon removal of the cone.
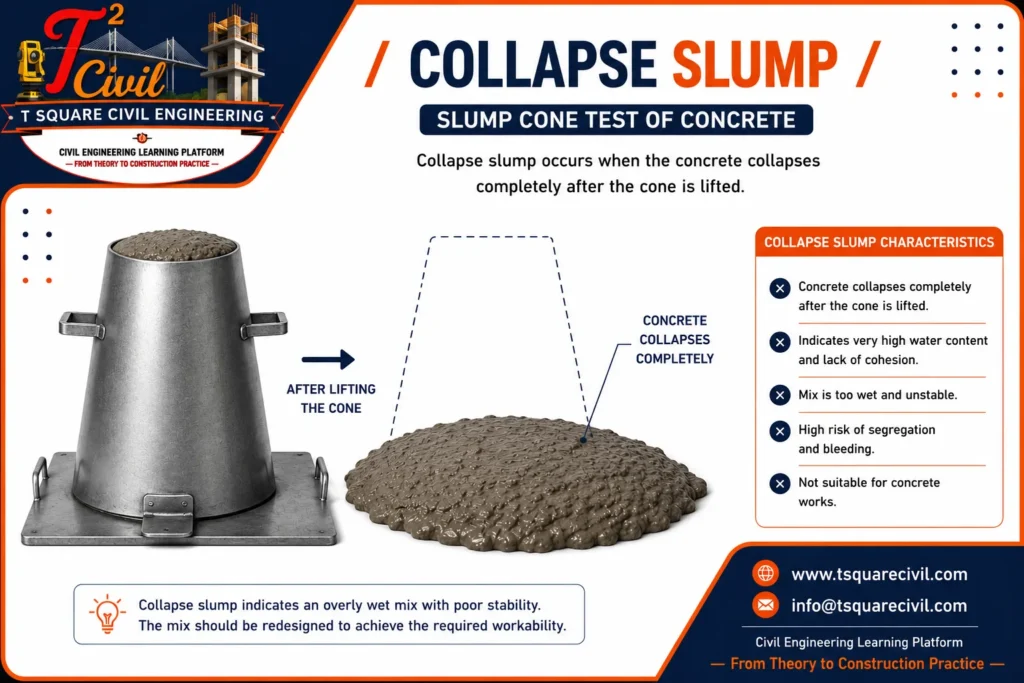
Characteristics:
• Sign of excess water content or an overly wet mix
• High potential for segregation and bleeding
• Often unsuitable for normal RCC work unless a high‑slump or flowable concrete is specifically required
These visual patterns are very useful for quick field assessment of concrete behaviour.
Comparison of Different Types of Slump
| Type of Slump | Appearance | Indicates | Action Required |
|---|---|---|---|
| True Slump | Uniform settlement | Good workability and cohesion | Record the slump value to the nearest 5 mm and compare it with the specified project requirement |
| Shear Slump | Concrete slips sideways | Poor cohesion or unstable mix | Take another sample and repeat the test |
| Collapse Slump | Complete collapse | Excess water or very high workability | Take another sample and repeat the test |
IS 1199 Test Validity Note: A numerical slump value is reported for a true slump. If the test produces a shear or collapse slump, repeat the procedure with another sample. If repeated tests again shear or collapse, record the condition and treat the slump method as unsuitable/invalid for that concrete consistency.
Classification of Workability Based on Slump Value
| Slump Value (mm) | Workability | Typical Applications |
|---|---|---|
| 0–25 | Very Low | Road pavements, roller-compacted concrete |
| 25–50 | Low | Mass concrete, large foundations |
| 50–100 | Medium | Beams, slabs, footings, general RCC works |
| 100–150 | High | Columns, congested reinforcement, pumped concrete |
| Above 150 | Very High | Pile concreting(Tremie concrete), Special applications only; risk of segregation if not designed accordingly |
Practical Interpretation Note: These ranges are general educational classifications for understanding concrete workability. They are not universal acceptance limits prescribed for every concrete mix. Always use the slump specified in the approved mix design, project specification and applicable quality-control documents.
Engineering Note: A higher slump does not automatically indicate weaker concrete. High workability may be intentionally achieved using suitable water-reducing or superplasticizing admixtures without increasing the specified water–cement ratio. An unexpectedly high slump should therefore be investigated against the approved mix proportions, water addition, aggregate moisture and admixture dosage.
Interpretation of Slump Test Results
The slump value should not be interpreted in isolation. Engineers should consider the approved concrete mix design, project specifications, environmental conditions, and intended method of placement before accepting or rejecting the concrete.
Low Slump
A low slump indicates stiff concrete with low workability. Such concrete may be difficult to place and compact, especially in heavily reinforced sections.
Possible consequences:
- Honeycombing.
- Poor surface finish.
- Inadequate compaction.
- Voids around reinforcement.
Medium Slump
A medium slump generally indicates good workability for normal reinforced concrete construction and is commonly suitable for beams, slabs, columns, and footings.
High Slump
A high slump indicates increased workability, making concrete easier to place in congested reinforcement or pumped concrete applications. However, the slump should remain within the specified project limits.
Excessively High Slump
An excessively high slump often indicates excessive water content or improper batching.
Possible consequences include:
- Segregation.
- Bleeding.
- Increased shrinkage.
- Lower compressive strength.
- Reduced durability.
- Surface cracking.
You can also read Our Other Articles
- Workability of Concrete
- Bleeding of Concrete
- Segregation of Concrete
- Honeycombing of Concrete
- Plastic Shrinkage Cracks in Concrete
- Concrete Cube Casting Procedure
- Compressive Strength Test of Concrete Cubes
- Standard Consistency Test of Cement
- Cement Bags Calculator
- Steel Weight Calculator
Typical Slump Ranges for Different Construction Works
The recommended slump depends on the type of structural member, method of placement, reinforcement congestion, and project specifications.
| Type of Construction | Recommended Slump (mm) |
|---|---|
| Road Pavements | 25–50 |
| Mass Concrete | 25–50 |
| Large Foundations | 25–75 |
| Footings | 50–75 |
| Slabs | 50–100 |
| Beams | 75–100 |
| Columns | 75–100 |
| Retaining Walls | 75–100 |
| Water Tanks | 75–100 |
| Pumped Concrete | 100–150 |
| Congested Reinforcement | 100–150 |
| Self-Compacting Concrete (SCC) | Slump test not generally suitable; use slump-flow test as specified |
Note: These values are general guidelines. Always follow the approved mix design, project specifications, and applicable standards.
Influence of Environmental Conditions on Slump
Environmental conditions significantly affect the workability of fresh concrete and the measured slump value. Even when the concrete mix design remains unchanged, factors such as temperature, wind speed, humidity, and transportation time can alter the slump.
| Environmental Condition | Effect on Slump | Recommended Action |
|---|---|---|
| High ambient temperature | Slump decreases due to rapid moisture loss | Minimise delays, protect concrete from direct sunlight, and follow approved hot weather concreting practices. |
| Strong wind | Reduces slump by increasing evaporation | Use windbreaks where practical and avoid prolonged exposure before placement. |
| Low relative humidity | Accelerates moisture evaporation | Begin placing and finishing promptly after testing. |
| Long transportation time | Gradual reduction in slump | Verify slump immediately before placement and follow the approved quality procedures. |
| Rainfall | May alter the surface condition of the sample | Protect the test area and sample from direct rain. |
Site Engineer’s Tip: Always interpret the slump result together with the prevailing weather conditions, transportation time, and the approved mix design.
Acceptance Criteria
The slump value should be evaluated together with the approved mix design and project requirements.
Concrete may generally be accepted when:
- The measured slump is within the specified range.
- The concrete exhibits a True Slump.
- There is no evidence of segregation or excessive bleeding.
- The concrete remains cohesive during handling.
- The workability is suitable for the intended structural element.
Concrete should be investigated or rejected if:
- Slump falls outside the specified tolerance.
- A repeated Shear Slump is obtained.
- A Collapse Slump occurs where not permitted.
- Segregation or bleeding is clearly visible.
- The concrete cannot be placed or compacted satisfactorily.
Site Engineer’s Note: Never accept or reject concrete solely on the basis of slump. Consider the approved mix design, environmental conditions, admixture usage, transportation time, and overall quality-control records.
When Should the Slump Test Be Repeated?
The slump test should be repeated in the following situations:
- A Shear Slump is observed.
- The sample was disturbed during testing.
- The slump cone moved while filling or compacting.
- The cone was not lifted vertically.
- The measured slump appears inconsistent with the expected workability.
- There is doubt about the representativeness of the sample.
When a repeat test produces similar results, the concrete mix should be reviewed before placement.
Factors Affecting Slump
The measured slump value depends on several factors that influence the workability of fresh concrete.
Water-Cement Ratio
Increasing the water content generally increases the slump, but excessive water may reduce strength and durability.
Aggregate Size and Grading
Well-graded aggregates improve workability, whereas poorly graded aggregates may reduce slump.
Aggregate Shape and Surface Texture
Rounded aggregates provide better workability than angular aggregates due to reduced internal friction.
Cement Content
Adequate cement paste improves lubrication between aggregates, resulting in better workability.
Chemical Admixtures
Plasticisers and superplasticisers can significantly increase workability without increasing the water-cement ratio.
Temperature
High temperatures accelerate moisture loss and hydration, reducing the slump of fresh concrete.
Time After Mixing
Workability decreases as concrete remains in the mixer or transit vehicle due to hydration and evaporation.
Mixing Quality
Uniform mixing produces consistent workability, while inadequate mixing may lead to variable slump values.
Advantages of the Slump Test
The slump cone test of concrete is popular because it offers several practical benefits:
• Very quick and simple to perform
• Low cost and requires minimal equipment
• Ideal for field testing and site quality control
• Provides immediate results for decision‑making
• Helps monitor workability from batch to batch during concreting operations
Limitations of the Slump Test
Despite its usefulness, the slump test has some limitations:
• It does not measure compressive strength directly
• Less suitable for very dry, harsh, or zero‑slump mixes
• Not accurate for self‑compacting or very high‑flow concretes
• Correct procedure and interpretation depend on the operator’s skill
• Cannot fully predict long‑term performance or durability of concrete by itself
For critical projects, the slump test must be supplemented by other tests (e.g., compaction factor, V‑be test, flow test, and standard strength tests).
Common Mistakes During Slump Test
| Mistake | Effect on Result |
|---|---|
| Dirty slump cone | Incorrect slump value |
| Uneven base plate | False measurement |
| Twisting the cone while lifting | Disturbed slump shape |
| Delayed testing | Lower slump value |
| Incorrect number of tamping strokes | Improper compaction |
| Lifting cone too quickly | Shear or collapse slump |
| Excess vibration | Wrong workability indication |
Troubleshooting Guide
| Observation | Possible Cause | Recommended Action |
|---|---|---|
| Very Low Slump | Low water content or loss of workability | Verify batching, transportation time, and mix design |
| High Slump | Excess water or high admixture dosage | Check water addition and admixture dosage |
| Shear Slump | Poor cohesion or improper grading | Repeat the test and review the mix design |
| Collapse Slump | Excessive workability or over-wet mix | Verify water-cement ratio and project requirements |
| Segregation | Excess water or poor grading | Improve aggregate grading and control water content |
| Bleeding | High water content | Review mix proportion and water dosage |
| Honeycombing After Placement | Low workability or poor compaction | Improve workability within specified limits and ensure proper vibration |
Slump Test vs Compaction Factor Test
Both the slump test and compaction factor test are used to assess concrete workability, but they differ in precision and application.
1. Purpose
• Slump test: Quick check of workability and consistency
• Compaction factor test: More precise measurement of workability, especially for low‑workability mixes
2. Accuracy
• Slump test: Moderate accuracy, mainly comparative
• Compaction factor test: Higher accuracy and better suited for research or laboratory work
3. Time Required
• Slump test: Very fast and convenient on-site
• Compaction factor test: Takes more time and effort
4. Equipment
• Slump test: Simple cone, base plate, and tamping rod
• Compaction factor test: More complex apparatus with hoppers and a cylinder
5. Field Use
• Slump test: Excellent for routine field quality control
• Compaction factor test: Limited field use; mainly in laboratories or in detailed investigations
Practical Applications of the Slump Cone Test
The slump cone test of concrete is commonly used for checking the workability of concrete and is routinely performed before the placement of concrete for the following:
- Residential buildings and small commercial projects
- RCC framed structures – beams, columns, slabs and footings
- Bridges and flyovers
- Culverts and water-retaining structures
- High‑rise buildings and towers
- Overhead and underground water tanks
- Roads, pavements and industrial floors
- Industrial structures and heavy foundations
- Metro rail projects
- Precast concrete plants
- Ready-mix concrete batching plants
On many construction projects, every concrete transit mixer is tested before unloading to ensure that the delivered concrete satisfies the specified workability requirements.
Practical Tips for Site Engineers
The Slump Cone Test is one of the quickest methods for assessing the workability of fresh concrete on construction sites. However, obtaining reliable results depends on proper testing techniques and adherence to quality-control practices. The following recommendations can help improve the accuracy and consistency of slump measurements.
Before the Test
- Verify that the slump cone, tamping rod, and base plate are clean and free from hardened concrete.
- Ensure the base plate is rigid, level, and non-absorbent.
- Collect a representative sample immediately after discharge from the transit mixer or batching plant.
- Protect the concrete sample from direct sunlight, rain, and strong winds before testing.
- Do not add extra water to the sample after collection.
During the Test
- Fill the slump cone in three approximately equal layers.
- Compact each layer with 25 uniform strokes using the standard tamping rod.
- Ensure the tamping rod penetrates slightly into the previous layer during compaction.
- Strike off the top surface flush with the cone.
- Lift the cone vertically in 5 ± 2 seconds using a steady upward movement without twisting, jerking or lateral movement.
- Measure the slump immediately after the concrete settles.
After the Test
- Record the slump value in millimetres.
- Note the type of slump (True, Shear, or Collapse).
- Record the concrete grade, batch number, location, time of testing, ambient temperature, and weather conditions.
- Compare the measured slump with the approved mix design and project specifications before allowing concrete placement.
Best Practice: On large construction projects, perform a slump test for each transit mixer or at the frequency specified in the project’s Quality Assurance Plan (QAP).
Slump Test Record Format
Maintaining proper slump test records is an important part of construction quality control.
| Particular | Observation |
|---|---|
| Project Name | __________ |
| Date | __________ |
| Time | __________ |
| Location | __________ |
| Structural Member | __________ |
| Concrete Grade | __________ |
| Mix Design Reference | __________ |
| Batch / Transit Mixer No. | __________ |
| Slump Value (mm) | __________ |
| Type of Slump | __________ |
| Ambient Temperature | __________ |
| Weather Condition | __________ |
| Engineer’s Remarks | __________ |
| Accepted / Rejected | __________ |
Slump Test vs Compaction Factor Test
| Parameter | Slump Test | Compaction Factor Test |
|---|---|---|
| Test Type | Field Test | Laboratory Test |
| Accuracy | Moderate | High |
| Suitable For | Medium Workability | Low Workability |
| Equipment | Simple | Complex |
| Time Required | Very Short | Longer |
| Cost | Low | Moderate |
QA/QC Checklist for the Slump Cone Test
The following checklist can be used by site engineers and quality-control personnel before accepting fresh concrete for placement.
| Check Item | Status (✓/✗) |
|---|---|
| Slump cone cleaned and undamaged | |
| Base plate level and non-absorbent | |
| Representative concrete sample collected | |
| Sample tested immediately after collection | |
| Cone filled in three equal layers | |
| Each layer compacted with 25 strokes | |
| Top surface struck off flush | |
| Cone lifted vertically without twisting | |
| Slump measured immediately | |
| Type of slump recorded | |
| Slump value within specified limits | |
| No segregation or excessive bleeding observed | |
| Results entered in quality-control records | |
| Concrete accepted as per project specifications |
Quality Control Tip: Maintaining proper slump test records helps identify trends, monitor consistency between batches, and support quality audits.
Safety Precautions During the Slump Cone Test
Although the slump test is a simple field procedure, always follow appropriate safety measures to protect personnel and ensure reliable results.
Personal Safety
- Wear safety shoes, gloves, and a helmet while performing the test on site.
- Use safety glasses when handling fresh concrete to prevent cement paste from entering the eyes.
- Wash exposed skin immediately after contact with wet concrete to avoid irritation.
Equipment Safety
- Inspect the slump cone and tamping rod for damage before use.
- Ensure that the base plate is stable and cannot move during testing.
- Clean all equipment after completing the test to prevent hardened concrete from affecting future measurements.
Quality Assurance
- Use only representative concrete samples.
- Perform the test without unnecessary delay.
- Avoid testing during heavy rain unless suitable protection is provided.
- Record all observations accurately and immediately after testing.
Important: Safe working practices improve both personnel safety and the reliability of test results. Accurate testing supports better construction quality and long-term structural performance.
Practical Site Scenario
Example
During the concreting of an RCC slab, the specified slump range was 75–100 mm.
The measured slump was 40 mm, indicating insufficient workability.
Instead of adding water at the construction site, the site engineer:
- Verified the batching records.
- Checked the transportation time.
- Confirmed that no unauthorized water had been added.
- Informed the quality control engineer.
- Obtained a fresh batch that complied with the approved mix design.
This approach ensured compliance with quality requirements and avoided compromising the strength and durability of the concrete.
Frequently Asked Questions (FAQs)
Q1. What is the Slump Cone Test of Concrete?
Answer:
The Slump Cone Test is a field test used to determine the workability and consistency of fresh concrete. It measures the vertical settlement (slump) of concrete after a standard slump cone is lifted vertically. The test helps engineers assess whether the concrete is suitable for transportation, placement, compaction, and finishing.
Q2. Which Indian Standard covers the Slump Cone Test?
Answer:
The Slump Cone Test is performed as per IS 1199 (Part 2): 2018, which specifies the procedure for determining the slump of fresh concrete. Other related standards include IS 456:2000, IS 10262:2019, and IS 516.
Q3. What is the purpose of the Slump Cone Test?
Answer:
The primary purpose of the Slump Cone Test is to determine the workability and consistency of fresh concrete before placement. It also helps maintain quality control, verify the mix consistency, and detect variations in water content or batching.
Q4. What are the standard dimensions of the slump cone?
Answer:
- Height: 300 mm
- Top Diameter: 100 mm
- Bottom Diameter: 200 mm
These dimensions are specified in IS 1199 (Part 2): 2018.
Q5. What are the dimensions of the tamping rod?
Answer:
- Diameter: 16 mm
- Length: 600 mm
- Ends: Rounded (Hemispherical)
Q6. How many layers should the slump cone be filled with?
Answer:
The slump cone should be filled in three approximately equal layers, with each layer compacted using 25 strokes of the tamping rod.
Q7. How is the slump value calculated?
Answer:
Slump (mm) = Height of Slump Cone − Height of Slumped Concrete
Example:
- Cone Height = 300 mm
- Final Height = 220 mm
Slump = 300 − 220 = 80 mm
Q8. What are the different types of slump?
Answer:
- True Slump
- Shear Slump
- Collapse Slump
Each type indicates different characteristics of the concrete mix.
Q9. Which type of slump is considered the best?
Answer:
True Slump is considered the most desirable because it indicates a cohesive concrete mix with adequate workability.
Q10. What causes a Shear Slump?
Answer:
A Shear Slump is usually caused by poor cohesion, improper aggregate grading, inadequate fines, or an unstable concrete mix.
Q11. What causes a Collapse Slump?
Answer:
A Collapse Slump generally occurs due to excessive water content, overuse of admixtures, or an excessively flowable concrete mix.
Q12. Does a higher slump indicate stronger concrete?
Answer:
No. A higher slump indicates greater workability, not higher strength. Excessively high slump due to additional water may actually reduce compressive strength and durability.
Q13. What is the ideal slump value for RCC work?
Answer:
For general RCC construction:
- Beams: 75–100 mm
- Columns: 75–100 mm
- Slabs: 50–100 mm
The exact value should comply with the approved mix design and project specifications.
Q14. How often should the slump test be performed?
Answer:
The testing frequency should follow the approved Quality Assurance Plan, project specification and contractual requirements. On some projects, each transit mixer or delivery is tested, while other projects use a defined sampling frequency.
Q15. Can the Slump Cone Test determine concrete strength?
Answer:
No. The Slump Cone Test only indicates workability and consistency. Compressive strength is determined separately using cube or cylinder tests.
Interview Questions with Answers
1. What is the Slump Cone Test?
Answer:
It is a field test used to determine the workability and consistency of fresh concrete.
2. Which IS Code is used for the Slump Cone Test?
Answer:
IS 1199 (Part 2): 2018
3. What is the standard height of the slump cone?
Answer:
300 mm
4. What are the top and bottom diameters of the slump cone?
Answer:
- Top Diameter = 100 mm
- Bottom Diameter = 200 mm
5. What is the diameter of the tamping rod?
Answer:
16 mm
6. How many tamping strokes are given in each layer?
Answer:
25 strokes
7. How many layers are used in the Slump Cone Test?
Answer:
Three approximately equal layers
8. What is meant by workability?
Answer:
Workability is the ease with which concrete can be mixed, transported, placed, compacted, and finished without segregation.
9. Name the three types of slump.
Answer:
- True Slump
- Shear Slump
- Collapse Slump
10. Which slump is preferred?
Answer:
True Slump
11. Why should the cone be lifted vertically?
Answer:
To avoid disturbing the concrete and obtain an accurate slump value.
12. What is the formula for calculating slump?
Answer:
Slump = Height of Cone − Height of Slumped Concrete
13. Can slump be increased by adding water?
Answer:
Although adding water increases slump, it may reduce strength and durability. Any adjustment should only be made as permitted by the approved mix design.
14. What is segregation?
Answer:
Segregation is the separation of coarse aggregate from the cement paste, resulting in non-uniform concrete.
15. What is bleeding in concrete?
Answer:
Bleeding is the upward movement of water to the concrete surface after placement due to settlement of solid particles.
16. Why is the slump test important?
Answer:
It provides a quick assessment of concrete workability, supports quality control, and helps ensure proper placement and compaction.
17. Is the slump test suitable for Self-Compacting Concrete (SCC)?
Answer:
No. SCC is generally evaluated using the slump-flow test, as the conventional slump test is not appropriate for highly flowable concrete.
18. When should the slump test be repeated?
Answer:
The test should be repeated if a Shear Slump is observed or if there is doubt about the validity of the result.
19. What is the major limitation of the slump test?
Answer:
It measures only workability and does not directly indicate the strength or durability of concrete.
20. What precautions should be taken during the slump test?
Answer:
Use clean equipment, a representative sample, proper compaction, vertical lifting of the cone, and immediate measurement of the slump.
Viva Voce Questions with Answers
1. Define the Slump Cone Test.
Answer:
A test used to determine the workability and consistency of fresh concrete.
2. What is slump?
Answer:
The vertical settlement of fresh concrete after the slump cone is lifted.
3. What is the height of the slump cone?
Answer:
300 mm.
4. What is the top diameter of the slump cone?
Answer:
100 mm.
5. What is the bottom diameter of the slump cone?
Answer:
200 mm.
6. What is the diameter of the tamping rod?
Answer:
16 mm.
7. What is the length of the tamping rod?
Answer:
600 mm.
8. How many layers are filled in the cone?
Answer:
Three layers.
9. How many strokes are given to each layer?
Answer:
25 strokes.
10. Which type of slump gives a valid numerical slump result?
Answer: A true slump gives the valid numerical slump result for reporting. However, a true slump alone does not prove that the concrete is acceptable; the measured value must also comply with the specified project requirement.
11. Which slump indicates poor cohesion?
Answer:
Shear Slump.
12. Which slump indicates excessive water?
Answer:
Collapse Slump.
13. Which test measures concrete strength?
Answer:
Compressive Strength Test.
14. Can the slump test determine durability?
Answer:
No.
15. What is the unit of slump?
Answer:
Millimetres (mm).
16. Which property of concrete is measured by the slump test?
Answer:
Workability.
17. What happens if the cone is twisted while lifting?
Answer:
The result becomes inaccurate.
18. Why is the slump measured immediately?
Answer:
To prevent changes in workability due to hydration and moisture loss.
19. What is the purpose of 25 tamping strokes?
Answer:
To ensure uniform compaction and remove entrapped air.
20. Why should the test be performed immediately after sampling?
Answer:
To obtain a representative measure of the fresh concrete’s workability.
21. What is honeycombing?
Answer:
Voids in hardened concrete caused by inadequate compaction.
22. What is the recommended slump for pumped concrete?
Answer:
Generally 100–150 mm, subject to the approved mix design and project specifications.
23. What is the main advantage of the slump test?
Answer:
It is quick, simple, economical, and suitable for routine field quality control.
24. What is the main limitation of the slump test?
Answer:
It indicates workability only and does not directly measure strength.
25. Why is the Slump Cone Test widely used?
Answer:
Because it provides a rapid, reliable, and economical assessment of fresh concrete workability, making it ideal for routine quality control on construction sites.
References
- IS 1199 (Part 2): 2018 – Method of determination of slump of fresh concrete.
- IS 456: 2000 – Plain and Reinforced Concrete – Code of Practice.
- IS 10262 – Concrete Mix Proportioning Guidelines.
- Concrete Technology by M. S. Shetty (for general reference).
Note: This article has been prepared for educational purposes by referring to relevant Indian Standards, standard civil engineering textbooks and relevant site practices. Readers should consult the latest official editions of the applicable standards for project-specific requirements.
For the latest revisions and official publications of Indian Standards, readers can refer to the Bureau of Indian Standards (BIS) website.
Conclusion
The Slump Cone Test of Concrete is one of the most widely used field tests for assessing the workability and consistency of fresh concrete before placement. Its simplicity, speed, and low cost make it an essential quality control tool on construction projects of all sizes.
Although the test does not directly determine the strength or durability of concrete, it provides valuable information about whether the concrete can be transported, placed, compacted, and finished effectively without excessive segregation or bleeding.
For reliable results, always carry out the test using clean equipment, a representative concrete sample, and the standard procedure specified in IS 1199 (Part 2): 2018. The measured slump should be interpreted together with the approved mix design, project specifications, environmental conditions, and the intended method of placement.
By following good testing practices and maintaining proper quality control records, engineers can improve construction quality, reduce defects, and contribute to durable and reliable concrete structures.
About T Square Civil Engineering
T Square Civil Engineering is a learning platform dedicated to providing accurate, practical, and easy-to-understand civil engineering knowledge. Our mission is to help students, site engineers, and construction professionals bridge the gap between engineering theory and real-world construction practice through detailed guides, calculators, and industry-focused resources.
Disclaimer: The information provided on T Square Civil Engineering is for educational purposes only. While every effort has been made to ensure technical accuracy, readers should verify the latest Indian Standards (IS Codes), project specifications, and applicable regulations before using this information for design, construction, testing, or quality control. T Square Civil Engineering is not responsible for any loss or damage arising from the use of this content.
Continue Your Learning
If you found this guide helpful, explore our other civil engineering resources:
- Standard Consistency Test of Cement
- Initial Setting Time Test of Cement
- Final Setting Time Test of Cement
- Soundness Test of Cement
- Fineness Test of Cement
- Compressive Strength Test of Cement
- Concrete Cube Casting Procedure
- Concrete Mix Design
- Cement Bags Calculator
- Steel Weight Calculator
These resources are designed to help students and professionals understand civil engineering concepts through practical examples, calculators, and step-by-step guides.