by
by Page Contents
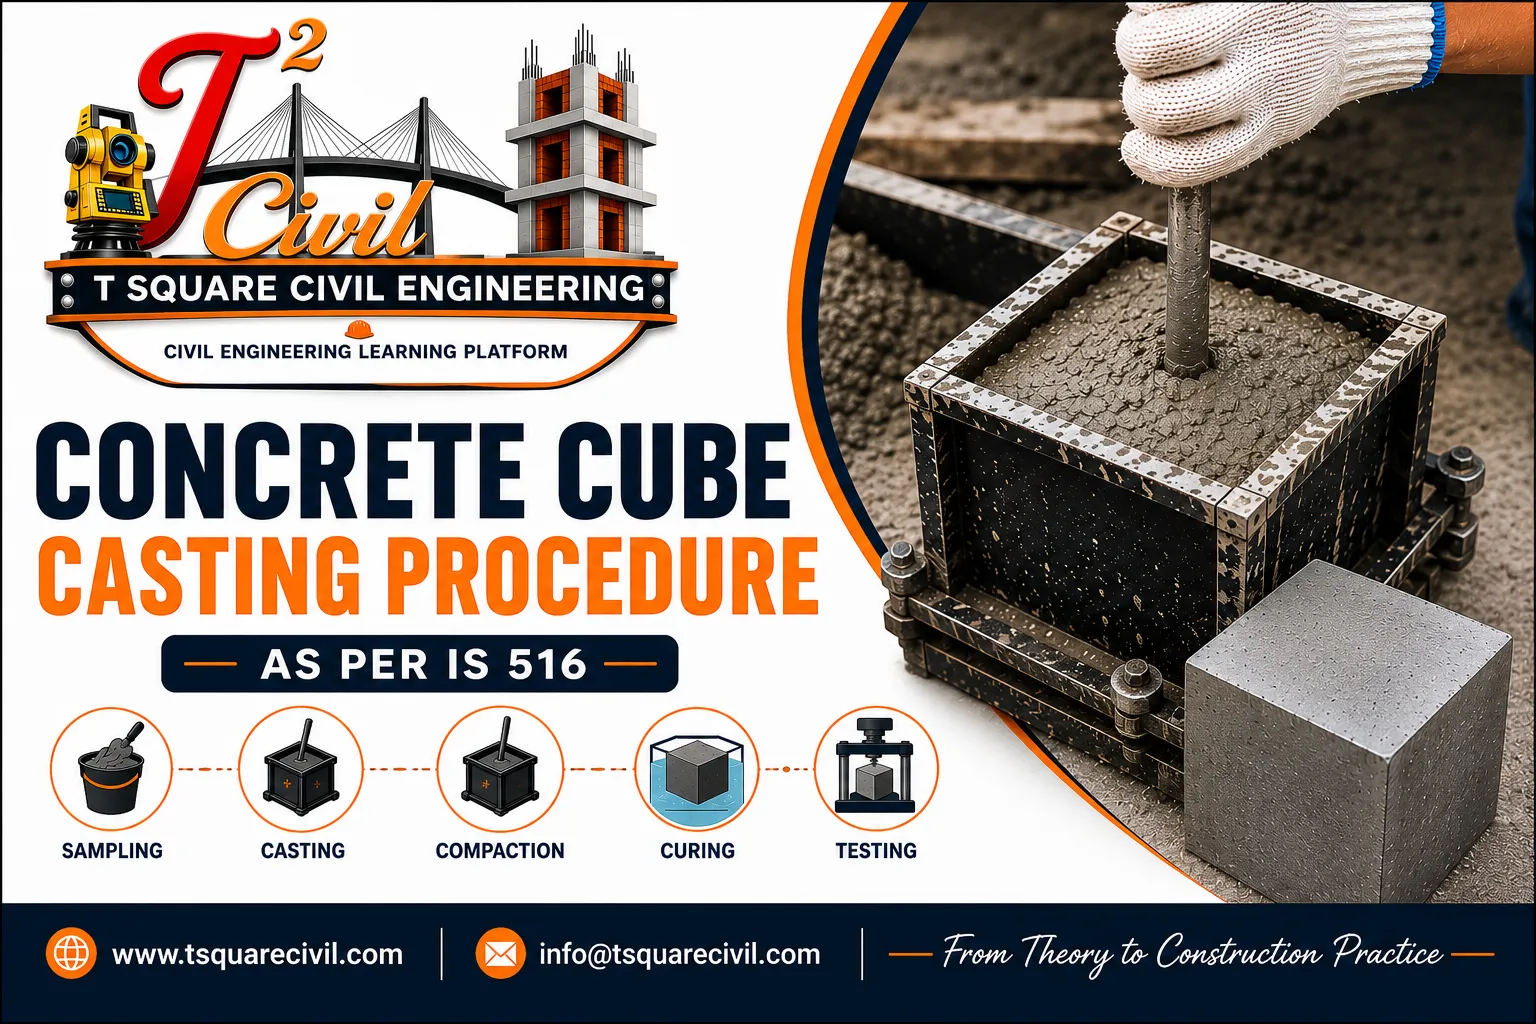
Concrete Cube Casting Procedure as per IS 516:2018 & IS 456:2000 – Complete Site Guide:
- Concrete cube casting is a crucial quality control activity on construction sites. Its goal is to assess the compressive strength of concrete and confirm that the supplied material meets the specified design criteria.
- The cube test enables engineers to check the quality of concrete used in structural elements such as columns, beams, slabs, footings, and retaining walls. The results ensure compliance with IS 456:2000 and IS 516:2018 standards.
- Typically, concrete cubes are tested after 7 and 28 days of curing. The 7-day test indicates early strength development, while the 28-day test serves as the standard for concrete acceptance.
Apparatus Required for Concrete Cube Casting
The following apparatus should be available before starting cube casting operations, and all equipment to be used should be clean and in good condition to avoid inaccurate test results.:- Cube moulds ( Size 150mm×150mm×150mm )
- Tamping Rod 16mm dia & 600mm long
- Sampling Tray
- Trowel
- Mould oil or release agent
- Identification tags or a permanent marker
- Water Curing tank
- Compression Testing Machine (CTM)
- Personal protective equipment (PPE)
The procedure of the test:
Step 1: Sampling of Fresh Concrete
Proper sampling is to be done because the concrete cube represents the whole structure or structural member for which concrete is being placed.Procedure
- Collect the sample from the discharge point of the transit mixer or batching plant.
- Avoid collecting concrete from the first or last portion of discharge.
- Take samples from different portions of the batch.
- Combine the samples and remix thoroughly to obtain a representative sample.
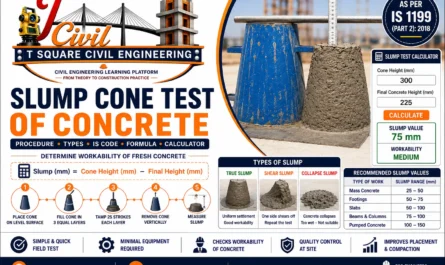
- Perform slump testing before cube casting.
Important Precautions
- Do not add extra water to the sample.
- Cube casting should begin immediately after sampling.
- Protect the sample from direct sunlight and excessive evaporation.
Step 2: Preparation of Cube Mould
Before casting concrete cubes, ensure that the cube moulds are properly prepared.Procedure
- Clean all internal surfaces of the mould.
- Remove old concrete particles and dust.
- Assemble the mould correctly.
- Tighten all bolts securely.
- Check that there are no gaps through which slurry can leak.
- Apply a thin layer of mould oil on all internal faces.
Inspection Checklist
✓ Mould dimensions to be verified✓ Bolts tightened✓ Internal surfaces clean✓ Mould oil applied uniformly✓ Identification number availableImproper mould preparation may lead to honeycombing, edge damage, and inaccurate test results.Step 3: Filling the Cube Mould
The concrete ordered for the structure is generally delivered via Transit Mixtures (TM). Collect the concrete sample from the transit mixture and fill the concrete in the prepared cube mould in layers to ensure proper compaction.Procedure
Fill the mould in three approximately equal layers.First Layer
- Place the first layer up to one-third of the mould depth.
- Compact the layer using 35 strokes of the tamping rod.
- Distribute the strokes uniformly throughout the surface.
Second Layer
- Place the second layer carefully.
- Compact with another 35 strokes.
- Allow the rod to penetrate slightly into the previous layer.
Third Layer
- Fill the mould completely.
- Compact with 35 strokes.
- Ensure complete compaction without segregation.
Total Strokes
35 strokes × 3 layers = 105 strokes per cubeProper compaction removes entrapped air and improves the accuracy of compressive strength results.Step 4: Surface Finishing
After compaction:- Add additional concrete if settlement occurs.
- Strike off excess concrete using a trowel.
- Finish the concrete surface level with the top of the mould.
- Produce a smooth and uniform finish.

Step 5: Identification and Marking
Immediately after casting, do the following:- Mark the cube number.
- Record the grade of concrete.
- Mention the location of concreting.
- Record casting date.
- Record batch number if available.
Example Identification
M35-C1-10/06/2026Where:- M35 = Grade of concrete
- C1 = Cube Number
- 10/06/2026 = Date of Casting
NOTE: Frequency/Number of Cubes to be cast:
- The required number of cubes to be cast for a particular structure depends upon the quantity of concrete required for the structure, and as per the IS456 Codal provision, the number of concrete cubes to be cast is given below:
Total Concrete Quantity required for the Structure (Cum) Number of Cube Samples
1cum to 5cum of concrete 1 set of cubes to be cast 6cum to 15cum of concrete 2 sets of cubes to be cast 16cum to 30cum of concrete 3 sets of cubes to be cast 31cum to 50cum of concrete 4sets of cubes to be cast 51cum of concrete and above 4set + one additional sample for each additional 50cum or part thereof
Step 6: Initial Storage of Cubes
After casting:- Keep cubes in a vibration-free area.
- Protect them from direct sunlight.
- Prevent moisture loss by covering a wet hessian cloth.
- Maintain temperature between 22°C and 32°C if possible.
Storage Duration
24 ± 0.5 hoursDisturbing cubes during this period can damage the cube internally and may affect strength results.Step 7: Demoulding of Cubes
After approximately 24 hours:- Remove the mould carefully.
- Avoid damaging cube edges.
- Inspect for cracks or honeycombing.
- Verify identification markings.
Step 8: Curing of Cubes
Immediately after demoulding:- Immerse cubes completely in clean water in the curing pond.
- Maintain continuous curing until testing.
- Ensure cubes do not touch each other.
- Maintain an adequate water level throughout the curing period.
Curing Duration
- 7 Days Cube
- 28 Days Cube
Step 9: Compression Testing of Cubes
The compressive strength test is performed using a Compression Testing Machine (CTM).Procedure
- Remove the cube from the curing pond.
- Clean the surface moisture of the concrete cubes.
- Measure dimensions if required.
- Place the cube centrally on the compressive testing machine platen.
- Apply load gradually without shock.
- Continue loading until failure occurs.
- Record maximum load.
Calculation of Compressive Strength
The compressive strength of concrete is calculated by dividing the maximum (failure) load by the cube’s loaded area.For a standard 150 mm x 150 mm x 150 mm concrete cube:The Loaded Area = 150 × 150 = 22,500 mm²For Example:Assume the maximum load at which the cube fails is known as the Failure Load = 900 kNThe Compressive Strength of the concrete cube = 900,000 ÷ 22,500Compressive Strength = 40 MPaRecord the result for each cube separately and calculate the average strength.Acceptance Criteria as per IS 456:2000
Concrete is considered acceptable when:- The average strength of test specimens exceeds the characteristic strength by the required margin.
- No individual test result falls below the specified limits given in IS 456.
- Review batching records.
- Verify curing practices.
- Conduct additional investigations.
- Consider core testing if necessary.
Common Mistakes During Cube Casting
Many cube failures result from poor site practices rather than poor concrete quality.Common Errors
- Dirty cube moulds
- Improper mould oil application
- Inadequate compaction
- Excessive vibration
- Delayed casting
- Wrong identification
- Early demoulding
- Insufficient curing
- Improper CTM loading